Thursday, November 28, 2013
Tuesday, November 26, 2013
Challenge Day 26 Revive a Wrinkled Ribbon
Wow! What happened to me? with all the rest of the challenge days?
Well, Life happened lol
I've been trying to get creative everyday, but planning for Thanksgiving :D
But here is my creativity of today :)
Making a wrinkle ribbon look like new
instead of using the regular iron
I took my hair iron, warmed it up,
and run the ribbon like if it was your hair,
that's it!
You can see here how straight is half of the ribbon
(on the back) sorry couldn't put it on the front
managing my camera in one hand and the rest on the other hand
wasn't that easy,
I guess I need a tripod ha!
I know what I am asking for Christmas lol
thanks for stopping by :)
Friday, November 22, 2013
Challenge Day 22 Sunglass Case part 2
I think this picture doesn't do justice
to all the work I put in this little piece of fabric hahaha!
I went to the store to get a red fabric to match my crochet piece
and this one I found is just perfect!
is hard to see in the picture, but it has red and some of that
dark red that the yarn has,
anyways, I do not do good sewing in a sewing machine
at least I think so,
so I am sewing this by hand
but to get it ready, I cut my piece of fabric 1/4" longer than what I need it
and fold that 1/4 by pining it and ironing it
to keep it from moving when I go to sew it :)
It shouldn't take long to do this
if you have all the materials at home
but since I don't do this often
it took me a little while to get it done
but... I did my creative part for today :)
thanks for visiting,
Thursday, November 21, 2013
Challenge Day 21 Blocking
Today I decided to try a new technique for me
Blocking
Blocking
Where you use steam on a crochet or knit item
to either stretch it, make the edges even or simply
just make it look better
The piece has to stay with the pins for a whole day
after steaming it
So I'll check tomorrow for the results :)
thanks for visiting :)
Wednesday, November 20, 2013
Challenge Day 19 & 20 Mug Cozy
Today I am super happy that I got another project done :)
I worked on this project for about a week on and off
three to four rows at the time
and finally today I woke up and said:
that's it! I am finishing it today!
And here it is
three to four rows at the time
and finally today I woke up and said:
that's it! I am finishing it today!
And here it is
and on the side I put a button so is easy to put it on and off
in any mug :)
Now if you want to make it here are the instructions:
I used knittin needles # 3
and yarn # 4
(one of the regular yarns that you see in the craft stores)
Cast on 17 sts.
and knit rice stitch until you have 24 cm. or 9 1/2 in.
bind off.
Then in the middle of one of the sides
make 5 chains with any crochet you have around
to make a look for the button.
On the other side sew the button
in the middle of the row.
And you are done.
This is a project you can make in a day
but my lack of time didn't allow me :)
Please share yours if you make one :)
thanks for visiting
Tuesday, November 19, 2013
Monday, November 18, 2013
Challenge Day 16 & 17 Digital Scrapbooking
Is really hard for me to use the computer during the weekends
so here I am today with my challenges from saturday and sunday
trying to be creative in a different way
I have play with my pictures creating a digital scrapbook :)
I work with PSPX2
for this picture I only added 2 diffent frames
but I colorized them with her favorite colors
This one has a charcoal effect
Pencil Effect choosing a pink color
Pencil Effect with a white color
Brush Stroke effect
For this picture I darken the background and
used a mask as a frame
This picture took me a lot of time,
as I had to remove all the background from the picture
make it a tube and then make the rest of the frame
using borders and inner bevels
And for this one I didn't remove the background
just added some borders
and decorate them with patterns to make it
stand out a little bit
Well, that was my creativitiy for the weekend,
let's see how do I get creative today
and hopefully post it tonight :)
Thanks for visiting
Friday, November 15, 2013
Challenge Day 15 Art Journaling and Mixed Media
Today I wanted to share an art journal page
that I did for my teenage daughter for her birthday
I am a beginner in art journaling
and I tried experimenting with acrylics and watercolors
different sponges and bubble wrap to print
handmade swirls (not the best lol) with permanent markers
and of course her favorite Bible Verse
which I chose to add a little mixed media to it
by sewing the corner, putting some rick rack ribbon and a button :)
An! and her favorite colors :)
Thank you so much for taking a look :)
Thursday, November 14, 2013
Challenge Day 14 Coasters
I am making this cute little crochet coasters
Here are the instructions:
I started with a magic ring
thenk 8 single crochet(sc) into the ring
join with a slip stitch(sl. st.)
Row 1: Chain 1 and 2 sc into the same st. then 2 sc in each following st
when you get to the last st. join with a sl. st.
Row 2: Ch 1 and 1 sc in the same st. then work *2 sc in the next st. and 1 sc in the next st.* and repeat from * to * then join with a sl. st.
Row 3: ch 1 and 1 sc in the sam st. then work *2sc in the next st, 1 sc in the next two st.* and repeat from * to * then join with a sl. st.
That's it! you are done :)
At the end leave a little yarn to weave through the last row you made for a neater look :)
I hope this encourage you to make your own
Enjoy!
Wednesday, November 13, 2013
Easy Crochet Heart
I made this crocheted heart
following the picture of this Pin
But I started with a magic ring
then I followed with double crochets and single crochets
like the picture says, but I stopped
at the row where is all single crochet all around the heart.
I hope you like it, if you make one plese share :)
Tuesday, November 12, 2013
Challenge Day 11 & 12 New Crochet Stitch
(Sigh) I couldn't post yesterday because
my sister came to spend the day with us :)
and since I am making this for her
I couldn't pull it out and take a picture of it
I am working on a new crochet stitch for me
that I found in Pinterest here
It doesn't look quite the same since the yarn is a little bit thicker
than the sample on pinterest
but is coming along good I think
I don't have a lot left to crochet here
I am making a sunglass case like this one
but better, since I've been reading a lot about crochet
and know what to do now for a better finished look :)
which I'll share in another post
as my project goes along :)
Thank you for stopping by,
Sunday, November 10, 2013
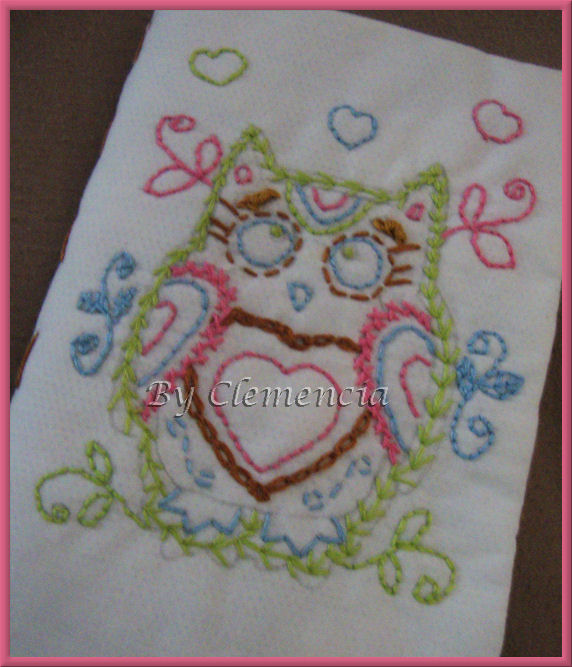
Challenge Day 10 Hand Sewn Owl Needle Book
Today I had a hard time with the Internet
bu finally got it to work :) to be able to post
Here is my finished Owl Needle Book
In case you are wondering the front is the Embroidered Owl
For this book I made the pages with felt
pink, blue and green
just like me Embroidered Owl
And I saw some pockets for the embroidery floss
with a blanket stitch
And on another page
I did a pocket for my scissors
And as you can see just a plain running stitch
for the middle of the book
holding the felt pages in :)
I sewed (I hope that's right) everything by hand
even the brown owl fabric to my embroidered owl :)
Thank you so much for taking a look :)
Saturday, November 9, 2013
Friday, November 8, 2013
Challenge Day 8 DIY Ribbon Organizer
I've been organizing my Scrapbooking/Craft area
for quite a while on and off, just whenever I have a little time
So this is my creative moment of the day.
This picture right here shows you where I've been planning to put
all my ribbons,
never mind the mess I have there, I'll work on it little by little
right now I just wanted this ribbons up there :D
This is an old but very firm repurposed entertainment center
which I am using for all my scraps, crafts, knitting, painting, etc.
The edge was very rough looking
that's why I painted right there
Now for the creative part :)
I bought a dowell to put my ribbons on
but I didn't have a way to hold the dowell
and my husband had this very handy super big paper clips
and Wala!
There is my ribbon holder :)
Now that I think about it, I should go paint the dowell too lol
Not the prettiest but very thrifty and very handy too :)
thanks for visiting :)
Thursday, November 7, 2013
Challenge Day 7 mini pies
O.k. These did not come out like I thought they would
My daughter was feeling crafty
so we decided to make some mini pies
from an American Girl book that she has
we were supposed to use bottle caps, but we only had one
(the one in the middle)
and for the rest we used waterbottle caps :/
we used felt to make it look like the pie crust
and beads to make the inside of the pie
We worked with what we had here at home
so Yeah! is not the best, but pretty good for a 8 y. old :)
I think :)
She says the green one is key lime pie
the blue is blueberry pie
and the red one is cherry pie,
they are the perfect size for polly pocket dolls,
just in case a mom out there wonders
and Ah! we used white glue to hold it all together
so they don't come apart and make a big mess :)
Thanks for visiting :)
Wednesday, November 6, 2013
Challenge Day 6 Applique and Digital signature
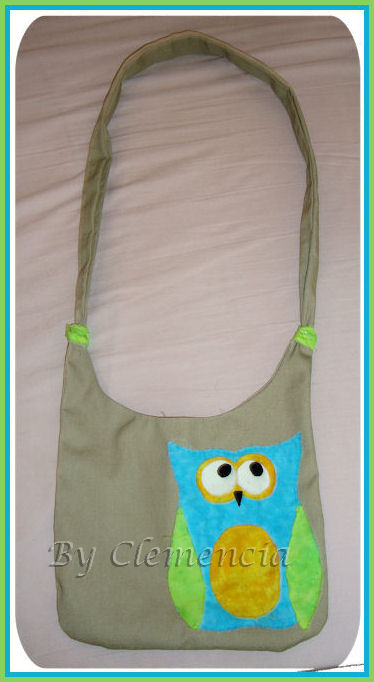
For my challenge today I have this super cute owl purse
that my teenage daughter made for me :)
She drew the owl herself
cut the pieces and glued to the purse
which she designed the pattern for also :)
So my work here was to saw by hand
around the edges of the owl
just in case whenever I have to wash the purse
my cute little owl doesn't come out :)
Isn't this adorable :)
And I also made my signature gift box
by following a PSP lesson through a yahoo group :)
Thanks for visiting :)
Tuesday, November 5, 2013
Challenge Day 5 Making T-shirt Yarn
I've been wanting to make T-shirt Yarn since
I saw this tutorial a while ago
I have it on my Pinterest here
But I took some pictures anyways of the step by step procedure
First you take a t-shirt
this is a child's one that is stained
(hard to see in the picture)
Then you fold it half
with the opening away from you
Then I measured an inch
an marked with a pen
An start cutting the t-shirt
leaving about 1/2 on the top without cutting
(that's what gives you the continuity of the yarn)
I tried cutting all the way to where the sleeves are
and it just doesn't work well
so seems like you can only use the body part of the t-shirt
Once is all cut
take the bottom of the -shirt
(where you started cutting)
and cut a slit at an angle
Then open the t-shirt up
and cut following the strand
(where I am pointing with the scissors)
to make a continuous yarn
Once all cut
stretch the strand
to make it curl
Now all you have to do is roll it into a ball :)
I have to tell you
I am so happy that I took this challenge
I feel that I accomplished something in my day
that brings happiness to my being :)
Thanks for visiting
and for all the support I am getting
AND... your awesome comments
it keeps me going :)
Subscribe to:
Posts (Atom)
Inspirational Video about the power of words
This video was sent to me on an email, I love it and I just have to share. Little things that we don't think about and need to be grat...

-
As some of you know I am a beginner art journaler, But I really like the results in this page. The way this background started...
-
Just playing around practicing my handwriting together with watercolor pencils I think I need to invest in watercolor paper lol...
-
Yes! this is a little crazy. A little bit of everything. Like always I've been analyzing my life and as I am trying to do t...


